Photography
Making Bold Statements with Color Blocking in Photography
- 500px Blog
- Featured
- Home Feed
Color blocking is a powerful photographic technique that uses bold, solid colors placed strategically within an image to create visual interest, impact, and drama. By embracing simplicity and contrast, photographers can craft visually striking images that command viewer attention and evoke strong emotions. Here’s how to master color blocking and transform your photographic storytelling. Understanding the Impact of Color Blocking Color blocking involves composing photographs around large, defined areas of […]
The post Making Bold Statements with Color Blocking in Photography appeared first on 500px.
Color blocking is a powerful photographic technique that uses bold, solid colors placed strategically within an image to create visual interest, impact, and drama. By embracing simplicity and contrast, photographers can craft visually striking images that command viewer attention and evoke strong emotions. Here’s how to master color blocking and transform your photographic storytelling. Understanding the Impact of Color Blocking Color blocking involves composing photographs around large, defined areas of color, usually complementary or contrasting hues. This method draws the viewer’s eyes directly toward key elements in the image, creating a memorable and dynamic visual effect. Choosing the Right Colors Effective color blocking starts with careful color selection: Complementary Colors: Colors directly opposite each other on the color wheel—such as blue and orange, or red and green—create visually arresting contrasts and emphasize each color vividly. Analogous Colors: Colors adjacent to each other on the wheel, such as blues and greens or reds and oranges, produce a harmonious yet still impactful aesthetic. Choose colors that reinforce your intended emotional tone—warm colors (reds, oranges) can evoke passion or excitement, while cool colors (blues, greens) can suggest tranquility or introspection. Creating Effective Compositions Composition is key in color blocking. Consider these tips to enhance your images: Simplicity is Strength: Focus on simplicity by eliminating clutter and distractions. Solid backgrounds and minimalist settings amplify the strength of your color choices. Balance and Proportion: Arrange your colors and subjects thoughtfully to create visual balance. Strategic use of negative space can heighten the impact of bold colors. Contrast for Clarity: High contrast between colors helps each element stand out clearly, ensuring your photograph’s composition remains compelling and visually accessible. Utilizing Light to Enhance Color Blocking Lighting dramatically influences how colors appear: Natural Light: Natural daylight, especially during golden hour, enhances color saturation and brings warmth and vibrancy to your image. Artificial Lighting: Creative use of studio lighting or off-camera flashes can emphasize or isolate color blocks, adding depth and dramatic flair to your photos. Advanced Techniques for Exceptional Results Take your color blocking to the next level with these advanced approaches: Layering Colors: Layer foreground and background colors strategically to add depth and intrigue, inviting viewers to explore multiple layers within your composition. Color Gradients: Introduce subtle gradients or transitions between color blocks to soften the effect slightly and add complexity to your visual storytelling. The Power of Intentionality The essence of successful color blocking lies in intentionality. Every color and placement should contribute meaningfully to your composition, enhancing the story or emotion you’re conveying. Thoughtful planning and deliberate execution are essential to mastering this compelling technique. By carefully selecting your palette, simplifying your compositions, and effectively leveraging lighting, color blocking can dramatically elevate your photographic narrative. Embrace boldness and let color guide your creative vision to produce unforgettable images. Extended reading: Color clashes and bold choices in photography The post Making Bold Statements with Color Blocking in Photography appeared first on 500px.

Capturing Meaningful Narratives with Environmental Portraits
- 500px Blog
- Featured
- Home Feed
- conceptual portraits
- creative lighting
- photography tips
- photography tips and tricks
- portrait photography
- travel photography
Environmental portraits go beyond traditional studio shots by placing subjects within surroundings that reveal something meaningful about their lives, interests, or professions. This photographic approach deepens storytelling, creating images rich in context and character. Here’s how you can master the art of environmental portraiture to produce compelling narratives. Understanding Environmental Portraiture Unlike standard portraits, environmental portraits provide viewers with context by including significant surroundings or objects that offer insights into […]
The post Capturing Meaningful Narratives with Environmental Portraits appeared first on 500px.
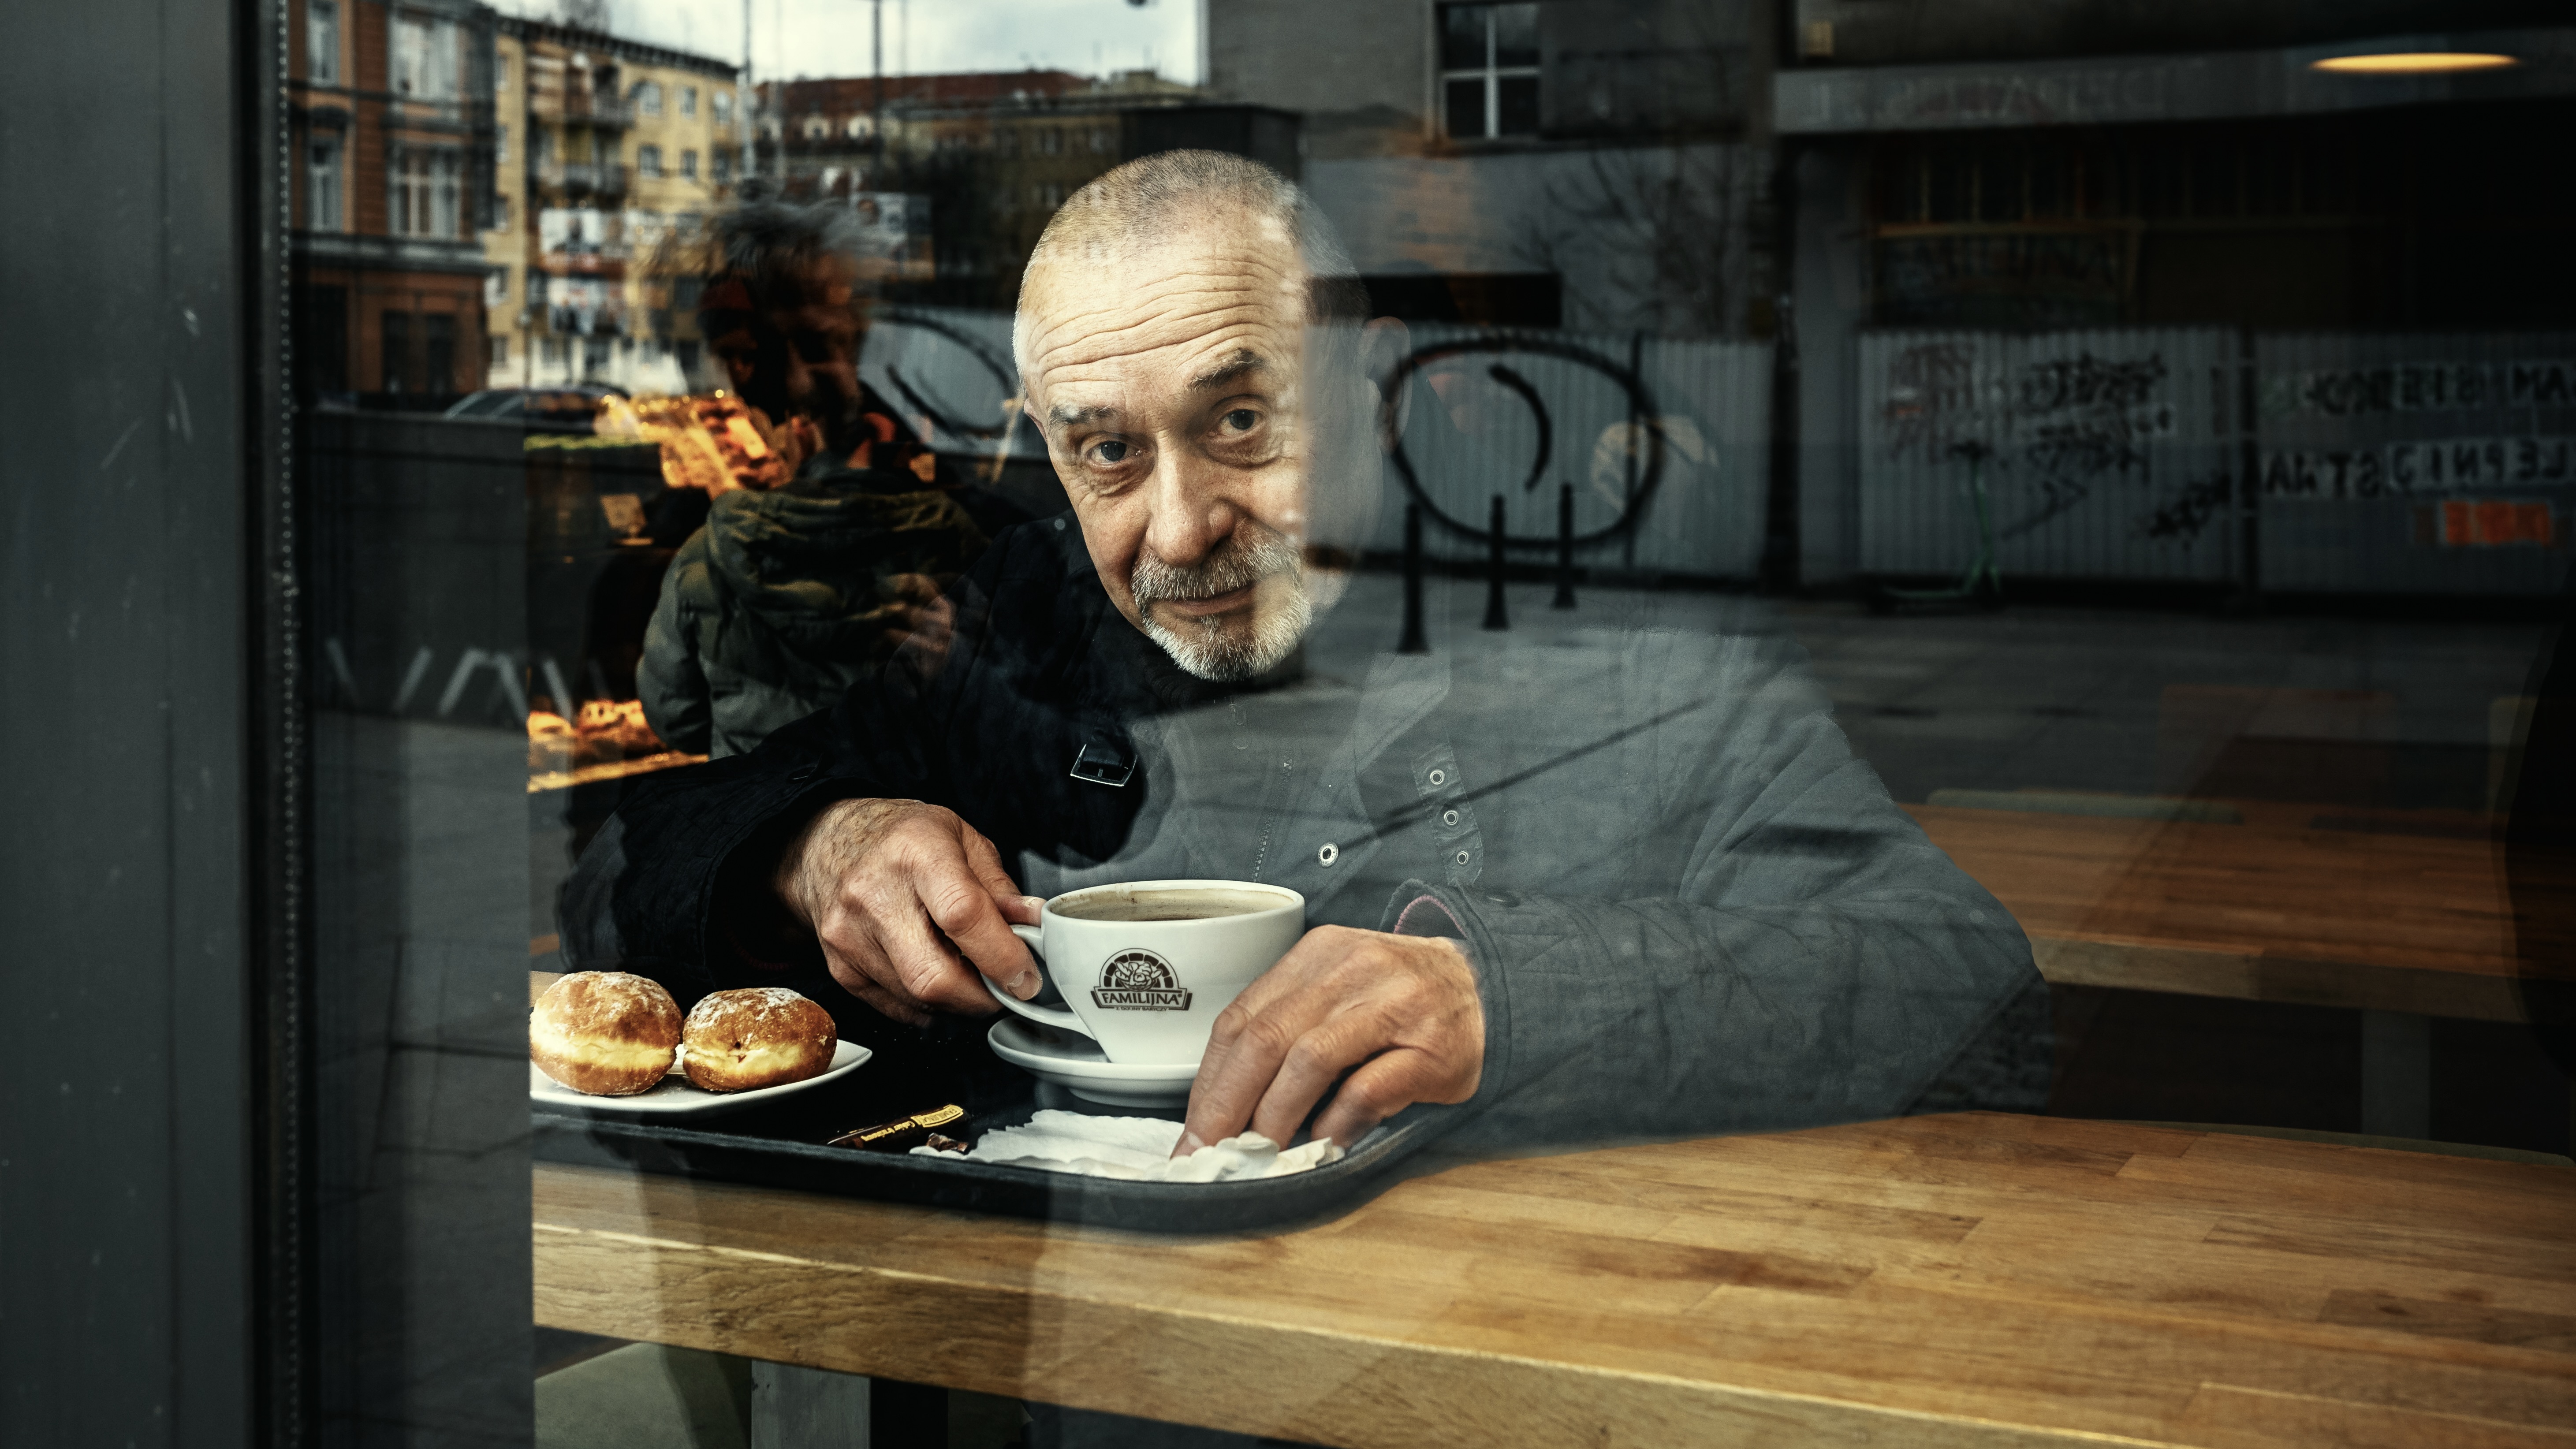
Environmental portraits go beyond traditional studio shots by placing subjects within surroundings that reveal something meaningful about their lives, interests, or professions. This photographic approach deepens storytelling, creating images rich in context and character. Here’s how you can master the art of environmental portraiture to produce compelling narratives. Understanding Environmental Portraiture Unlike standard portraits, environmental portraits provide viewers with context by including significant surroundings or objects that offer insights into the subject’s world. Whether it’s an artist in their studio, a chef in their kitchen, or an athlete on their home field, these settings amplify the narrative, adding depth and authenticity to your images. Choosing the Right Environment Relevance and Authenticity Ensure the chosen environment directly relates to your subject’s identity, profession, or passion. Authenticity resonates strongly with viewers. Visual Appeal Look for locations with appealing textures, colors, and lighting opportunities. Interesting spaces naturally draw viewer attention and enhance your subject. Utilizing Light and Composition Effectively Harnessing Natural Lighting Leverage available natural light creatively. Windows, doorways, or outdoor locations can provide soft, flattering illumination that highlights your subject’s connection to their environment. Composing for Impact Employ compositional strategies like framing, leading lines, and balanced layering to guide the viewer’s eye through the environment and directly toward your subject. Capturing Authentic Interactions Encourage your subject to interact naturally with their environment. Genuine engagement with surroundings—like a musician tuning their instrument or a craftsman working on their creation—creates authentic, engaging imagery. Avoid overly posed or unnatural arrangements, focusing instead on genuine actions that reflect true personality and narrative. Extended reading: Create portraits inspired by masters Enhancing Narratives through Detail and Placement Including Narrative Details Subtle yet significant details enrich the portrait’s narrative. Items like personal tools, photographs, or meaningful objects can provide additional context and emotional layers, deepening the viewer’s connection. Strategic Subject Placement Thoughtful positioning of your subject within their environment emphasizes their connection to the space, ensuring they remain the focal point without becoming lost or overshadowed by surrounding details. Refining Your Environmental Portraits The true strength of an environmental portrait lies in its ability to communicate clearly and powerfully. Carefully enhance important details in post-processing, selectively emphasizing narrative elements without overwhelming your subject. Consider subtle color grading adjustments to amplify emotional tones—warmer hues for intimacy and nostalgia or cooler tones for reflection and professionalism. Environmental portraiture offers photographers a unique opportunity to explore storytelling through the lens. With thoughtful attention to detail, strategic composition, and genuine interactions, you can create images that resonate deeply, portraying subjects in ways that feel both authentic and compelling. Embrace the challenge, and let your creativity unfold. The post Capturing Meaningful Narratives with Environmental Portraits appeared first on 500px.
Creative Lighting Setups to Enhance Your Portraiture
- 500px Blog
- Featured
- Home Feed
- 500px
- inspiration
- photography
- photography tips
- photography tips and tricks
- portrait
- portrait photography
- portraits
Elevating your portrait photography involves exploring lighting beyond conventional methods. Advanced lighting setups can infuse your portraits with greater depth, emotional resonance, and artistic flair, allowing you to tell richer visual stories. Here’s how you can push creative boundaries using sophisticated lighting techniques. Exploring the World of Creative Lighting Traditional three-point lighting has its merits, but innovative setups can help photographers uncover new expressions and moods. Creative lighting can transform […]
The post Creative Lighting Setups to Enhance Your Portraiture appeared first on 500px.
Elevating your portrait photography involves exploring lighting beyond conventional methods. Advanced lighting setups can infuse your portraits with greater depth, emotional resonance, and artistic flair, allowing you to tell richer visual stories. Here’s how you can push creative boundaries using sophisticated lighting techniques. Exploring the World of Creative Lighting Traditional three-point lighting has its merits, but innovative setups can help photographers uncover new expressions and moods. Creative lighting can transform portraits from simple captures into captivating visual narratives. Dramatic Portraits with Colored Gels Adding Emotional Depth Colored gels introduce a powerful visual component, dramatically altering the mood and atmosphere of your images. Experiment by matching gel colors to specific emotions or themes—cool blues and greens evoke calmness or introspection, while warm reds and oranges convey passion or intensity. Practical Gel Techniques Use gels selectively on rim lights to outline subjects and enhance depth or on background lights to create vivid backdrops that complement your subject’s character. Extended reading: How to use complementary colors to make your photos pop Combining Continuous and Flash Lighting Blending Movement and Clarity Integrating continuous lighting with flash can yield extraordinary results, providing both control and creative flexibility. Continuous lighting softly captures subtle movements, enhancing a portrait’s dynamism, while strategically placed flashes freeze critical details precisely. Adjusting your camera’s shutter speed allows you to blend ambient continuous light with the sharpness of the flash, offering artistic control over the balance of motion and clarity. Unconventional Modifiers for Unique Effects Explore unconventional lighting modifiers to achieve distinct effects: Reflective surfaces, mirrors, and metallic textures introduce intriguing highlights and reflections. Custom-made gobos—cut-outs or patterns placed in front of lights—can project shadows and textures onto your subject or background, adding layers of storytelling and visual interest. Fine-Tuning Your Advanced Lighting Setup Mastering Lighting Ratios Lighting ratios are crucial in controlling emotional intensity in portraits. By manipulating the strength and direction of lights, you can achieve diverse styles, from soft, evenly-lit scenes to dramatic, high-contrast visuals. Sculpting with Shadows Deliberately position lights to sculpt and highlight your subject’s features, using shadows purposefully to convey deeper emotions. Layered lighting—foreground and background illumination—creates depth and guides the viewer through your composition, enhancing narrative and visual interest. Bringing It All Together When experimenting with creative lighting techniques, remain intentional and thoughtful. The most impactful portraits are those where every lighting choice contributes meaningfully to the image’s emotional and narrative strength. Continually refine your approach, remain open to experimentation, and let your artistic vision guide your lighting decisions. Ultimately, the creative possibilities are endless—use them to leave a lasting impression with every portrait you create. The post Creative Lighting Setups to Enhance Your Portraiture appeared first on 500px.
Adding Energy and Movement with Creative Motion Blur
- 500px Blog
- Headline
- Home Feed
- 500px
- creative
- inspiration
- photography tips
- photography tips and tricks
Portrait photography often emphasizes sharpness and clarity, but introducing intentional creative blur techniques can breathe dynamic life into your images. Motion blur captures energy, expresses emotion, and transforms portraits from static images into visually compelling narratives. Here’s how you can master this technique and elevate your portrait photography. Why Embrace Motion Blur? Intentional motion blur brings portraits to life by conveying movement, artistic expression, and emotional depth. It allows photographers […]
The post Adding Energy and Movement with Creative Motion Blur appeared first on 500px.
Portrait photography often emphasizes sharpness and clarity, but introducing intentional creative blur techniques can breathe dynamic life into your images. Motion blur captures energy, expresses emotion, and transforms portraits from static images into visually compelling narratives. Here’s how you can master this technique and elevate your portrait photography. Why Embrace Motion Blur? Intentional motion blur brings portraits to life by conveying movement, artistic expression, and emotional depth. It allows photographers to push beyond traditional boundaries, creating unique and memorable images that resonate with viewers. Techniques to Capture Motion Blur Mastering Shutter Speed Slow shutter speeds between 1/10 to 1/60 seconds effectively capture motion blur. A slower shutter intensifies the blur, while slightly faster speeds create subtle effects that suggest gentle movement without overwhelming your subject. Intentional Camera Movement (ICM) Moving your camera deliberately during exposure can create striking backgrounds and abstract patterns that highlight your subject. Vertical or horizontal sweeps, rotations, and subtle shakes can all yield compelling artistic results, adding energy and creativity to your portraits. Encouraging Subject Movement Invite your subjects to naturally move—walking, spinning, or dancing—to authentically capture their energy and personality. Pair their movement with slower shutter speeds to artfully blend motion and emotion into your frame. Disrupting depth of field: Creative approaches to blur and focus Enhancing Motion with Creative Flash Techniques Using flash creatively alongside motion blur can lead to extraordinary images. Rear-curtain sync, where the flash fires at the end of the exposure, freezes your subject clearly against dynamic motion trails, emphasizing both clarity and movement. Experimenting with mixed ambient and artificial lighting can further enhance the dramatic effect of your portraits. Advanced Strategies for Exceptional Results Selective Focus Combine motion blur with a shallow depth of field, drawing the viewer’s eye precisely to your subject’s most expressive features. This technique intensifies emotional connection and visual impact. Creative Color and Lighting Using colored gels or carefully chosen lighting setups can amplify the emotional atmosphere of your portraits. Colors and intentional lighting placement reinforce the narrative created by the motion blur, enhancing overall mood. Composition and Directional Blur Align the direction of your blur with your compositional intent. Horizontal blur suggests speed and directionality, while circular blur can evoke chaos or confusion. Careful alignment helps communicate the story clearly and powerfully. Refining Your Artistic Vision Integrating motion blur into portraits requires thoughtful experimentation. Embrace the unpredictability of the technique, and let your creative instincts guide your choices in lighting, color, and movement. Remember, the most compelling portraits often emerge from unexpected results. Trust your vision, explore boldly, and you’ll discover captivating ways to tell visual stories filled with energy and emotion. The post Adding Energy and Movement with Creative Motion Blur appeared first on 500px.

500px 2024 BEST 10 Photography Competition Winners Announced!
- 500px Blog
- 500px News
- Headline
- Home Feed
As one of China’s most influential professional photography competitions, the BEST 10 Photography Competition, organized by the 500px Photography Community under Visual China Group—has long been committed to discovering and supporting outstanding photographic talent, establishing itself as a benchmark in China’s imaging industry. Since its inception, the contest has been held 17 times, receiving over 5.8 million submissions and attracting more than 110,000 participants. In 2024, the BEST 10 Photography […]
The post 500px 2024 BEST 10 Photography Competition Winners Announced! appeared first on 500px.
As one of China’s most influential professional photography competitions, the BEST 10 Photography Competition, organized by the 500px Photography Community under Visual China Group—has long been committed to discovering and supporting outstanding photographic talent, establishing itself as a benchmark in China’s imaging industry. Since its inception, the contest has been held 17 times, receiving over 5.8 million submissions and attracting more than 110,000 participants. In 2024, the BEST 10 Photography Competition opened for submissions on 20 December 2024. During the 71-day submission period, it drew participation from over 21,000 photographers and received 330,000+ entries. After rigorous evaluation and professional curation by the 500px editorial team, 60 winning works were selected across three categories: Photo Series of the Year, Single Image of the Year, and Video of the Year. Today, we are thrilled to announce the winners of the BEST 10 Photography Competition. Photo Series of the Year 10 photographers were awarded in this category, including Wangkai Wei, Xun Ren, Weikai Chen, Jinyi He, Wenqi Lin, Xiaodong Zeng, Xiaotong Jia, Zi Rui Liu, Ruochen Kong, Zi Jin. (Highlights from the collection) “Little Moments” by Wenqi Lin Wenqi Lin’s Little Moments recreates post-80s childhood memories through meticulously crafted miniature scenes. Nostalgic details—an old electric fan, faded wall photos, and freshly cut watermelon—transport viewers to a pre-smartphone era of innocence. The warm lighting and rustic textures celebrate the simple joys of the past. “Little Moments” by Wenqi Lin Single Image of the Year Nature 10 winners, including Zhengjie Wu, A Little Squint, Xuanhua Li, Feng Xiong, Jiandong Hao, Bin Chen, Xuhaha, ATIME-PHOTOGRAPHY, Ruijiao Li, Egg. “Kailash and Ice” by Egg Egg’s Kailash and Ice captures Tibet’s Mount Kailash using focus-stacking techniques to juxtapose the mountain’s grandeur with the sacred landscape. The composition balances glacial permanence against swirling clouds, merging nature’s majesty with spiritual transcendence. “Kailash and Ice” by Egg Documentary 10 winners, including Lun Yu, Xiaokang Xu, Kinguv Shi, Qiang Sun, Weipeng Zheng, Yuanwai Wang, Wenpeng Lu, Ran An, 2middle, Xiangsheng Zhang. “Liangshan Yi Funeral” by Kinguv Shi Kinguv Shi’s Liangshan Yi Funeral documents a burial ceremony in Sichuan’s Yi Autonomous Prefecture. Mourners in black charva (woolen capes) march through heavy snow, their solemnity contrasted by snow-capped mountains—a poignant meditation on life and nature. “Liangshan Yi Funeral” by Kinguv Shi Urban 10 winners, including RX-105 XI, Shuhe Zhang, Mandy, Jun Shen, Leo Cai, Xuecheng Liu, Hao Liu, The Wind Rings the Bell, Sulin Yang, Yuan Li. “Cosmic Center” by Xuecheng Liu Xuecheng Liu’s Cosmic Center reimagines New York’s Times Square through an aerial panorama. Using advanced stitching techniques, the photograph transforms concentric skyscrapers into a radiant vortex, with steel-and-glass facades converging toward the frame’s center. “Cosmic Center” by Xuecheng Liu Commercial & Creative 10 winners, including Jinyang Ding, Boring Filming, Yao, Fadis Ding, Xiyuan Chen, Shuai Bian, Huizhao Li, Yanquan Lin, Tianhang Zhang, Chen Qiu. “Summer Party” by Boring Filming Summer Party employs aerial photography and digital compositing to synchronize human activity from different temporal moments within a single frame. The result is a vibrant tableau of surreal whimsy, turning an ordinary summer scene into something extraordinary. “Summer Party” by Boring Filming Video of the Year 10 winners, including: Jiyuan Wang, Ruiyu Song, Luxiang Zhu, Changsen Chi, Zukai Wang, Ziyu Wang, Wenfei Li, Fing, Yonghui Zhao, Cycle. “My Year 2024” by Cycle Cycle’s My Year 2024 is a first-person chronicle of year-round adventures—from snow-capped summits to tropical rainforests, rocket launch sites to Xinjiang’s icy wilderness. Through rapid-fire editing and immersive cinematography, the video captures the highs and lows of exploration, reflecting humanity’s ongoing dialogue with the planet. https://iso.500px.com/wp-content/uploads/2025/04/13-video.mp4 2024 BEST 10 Photography Awards Successfully Conclude This year, we witnessed countless extraordinary moments frozen in time, celebrating photography’s power to transcend borders, languages, and cultures. Explore all winning works in our gallery. Special thanks to our partners for their invaluable support. Your trust and collaboration have empowered these stunning visual stories to shine. In no particular order. Join us in 2025! Capture the planet’s beauty, push creative limits, and write photography’s next chapter. Not on 500px yet? Sign up here to explore more impactful photography. The post 500px 2024 BEST 10 Photography Competition Winners Announced! appeared first on 500px.

Crafting Cinematic Portraits with the Brenizer Method
- 500px Blog
- Headline
- Home Feed
- photography tips
- photography tips and tricks
- portrait photography
- The Bokeh Effect
Portrait photography continually evolves, and creative photographers constantly seek innovative techniques to distinguish their work. One standout approach is the Brenizer Method—also known as the “bokeh panorama.” This technique merges multiple images into one panoramic portrait, creating a cinematic aesthetic with an exceptionally shallow depth of field. By mastering this method, you can capture portraits that combine the expansive viewpoint of a wide-angle lens with the elegant bokeh typically associated […]
The post Crafting Cinematic Portraits with the Brenizer Method appeared first on 500px.
Portrait photography continually evolves, and creative photographers constantly seek innovative techniques to distinguish their work. One standout approach is the Brenizer Method—also known as the “bokeh panorama.” This technique merges multiple images into one panoramic portrait, creating a cinematic aesthetic with an exceptionally shallow depth of field. By mastering this method, you can capture portraits that combine the expansive viewpoint of a wide-angle lens with the elegant bokeh typically associated with longer focal lengths. Understanding the Brenizer Method The Brenizer Method, popularized by wedding photographer Ryan Brenizer, involves capturing a scene through a series of overlapping photographs and stitching them together digitally. The result? Portraits boasting wide-angle views with pronounced subject separation, producing an impactful, cinematic effect impossible with traditional lenses. Equipment and Setup To effectively utilize the Brenizer Method, consider the following: Lens Choice: Typically, prime lenses between 50mm to 135mm with wide apertures (f/1.4–f/2.8) produce optimal results. Camera Settings: Shoot in manual mode, locking exposure, white balance, and focus to ensure consistency across all shots. Tripod Use: While handheld shooting is possible, a tripod provides stability and consistency, simplifying stitching during post-processing. Step-by-Step Shooting Technique Follow these steps to execute the Brenizer Method successfully: Begin by photographing your subject clearly, setting your desired aperture and focal distance. Capture surrounding shots systematically, ensuring each new image overlaps the previous one by approximately 30%. Cover the entire intended scene, expanding both vertically and horizontally. Advanced Tips for Stunning Results Enhance your Brenizer panoramas with these advanced strategies: Plan for Stitching: Leave additional space around your composition to facilitate cropping and adjustments during the stitching process. Manage Subject Movement: Minimize movement between shots—this method works best with static poses to ensure seamless stitching. Consider Background Depth: Choose backgrounds that amplify depth, such as distant landscapes or architectural settings, enhancing the panoramic effect. Post-Processing and Stitching The true magic of the Brenizer Method emerges during post-processing: Use software like Adobe Photoshop’s Photomerge feature or specialized programs like PTGui. After stitching, carefully refine the panorama—crop, adjust exposure, and fine-tune colors for visual consistency. Apply subtle edits to enhance depth and contrast, further emphasizing the cinematic appeal. 40+ Beautiful Bokeh Images That Capture Your Imagination Common Mistakes to Avoid Watch out for these pitfalls: Insufficient Overlap: Not overlapping enough can create stitching gaps or misaligned elements. Inconsistent Focus and Exposure: Ensure all images maintain the same settings to avoid uneven sharpness or exposure variations. Subject Too Close to Edges: Keep your main subject central to avoid distortion or cropping issues during stitching. Final Thoughts Mastering the Brenizer Method opens doors to creative portrait possibilities, delivering visually stunning results that stand out in portfolios. By carefully planning your shots, managing your camera settings, and perfecting your stitching technique, you can consistently produce cinematic portraits that captivate viewers and elevate your artistic expression. The post Crafting Cinematic Portraits with the Brenizer Method appeared first on 500px.

Playing with depth of field in urban photography
- 500px Blog
- Headline
- Home Feed
- apertures
- blur
- cityscape
- compositions
- creative tools
- depth of field
- elevate your storytelling
- emotional photography
- focal lengths
- focus
- guide the viewer’s eye
- urban photography
- urban shots
Depth of field (DoF) is one of the most powerful compositional tools in photography, allowing you to control what’s in focus and what fades into the background.
The post Playing with depth of field in urban photography appeared first on 500px.
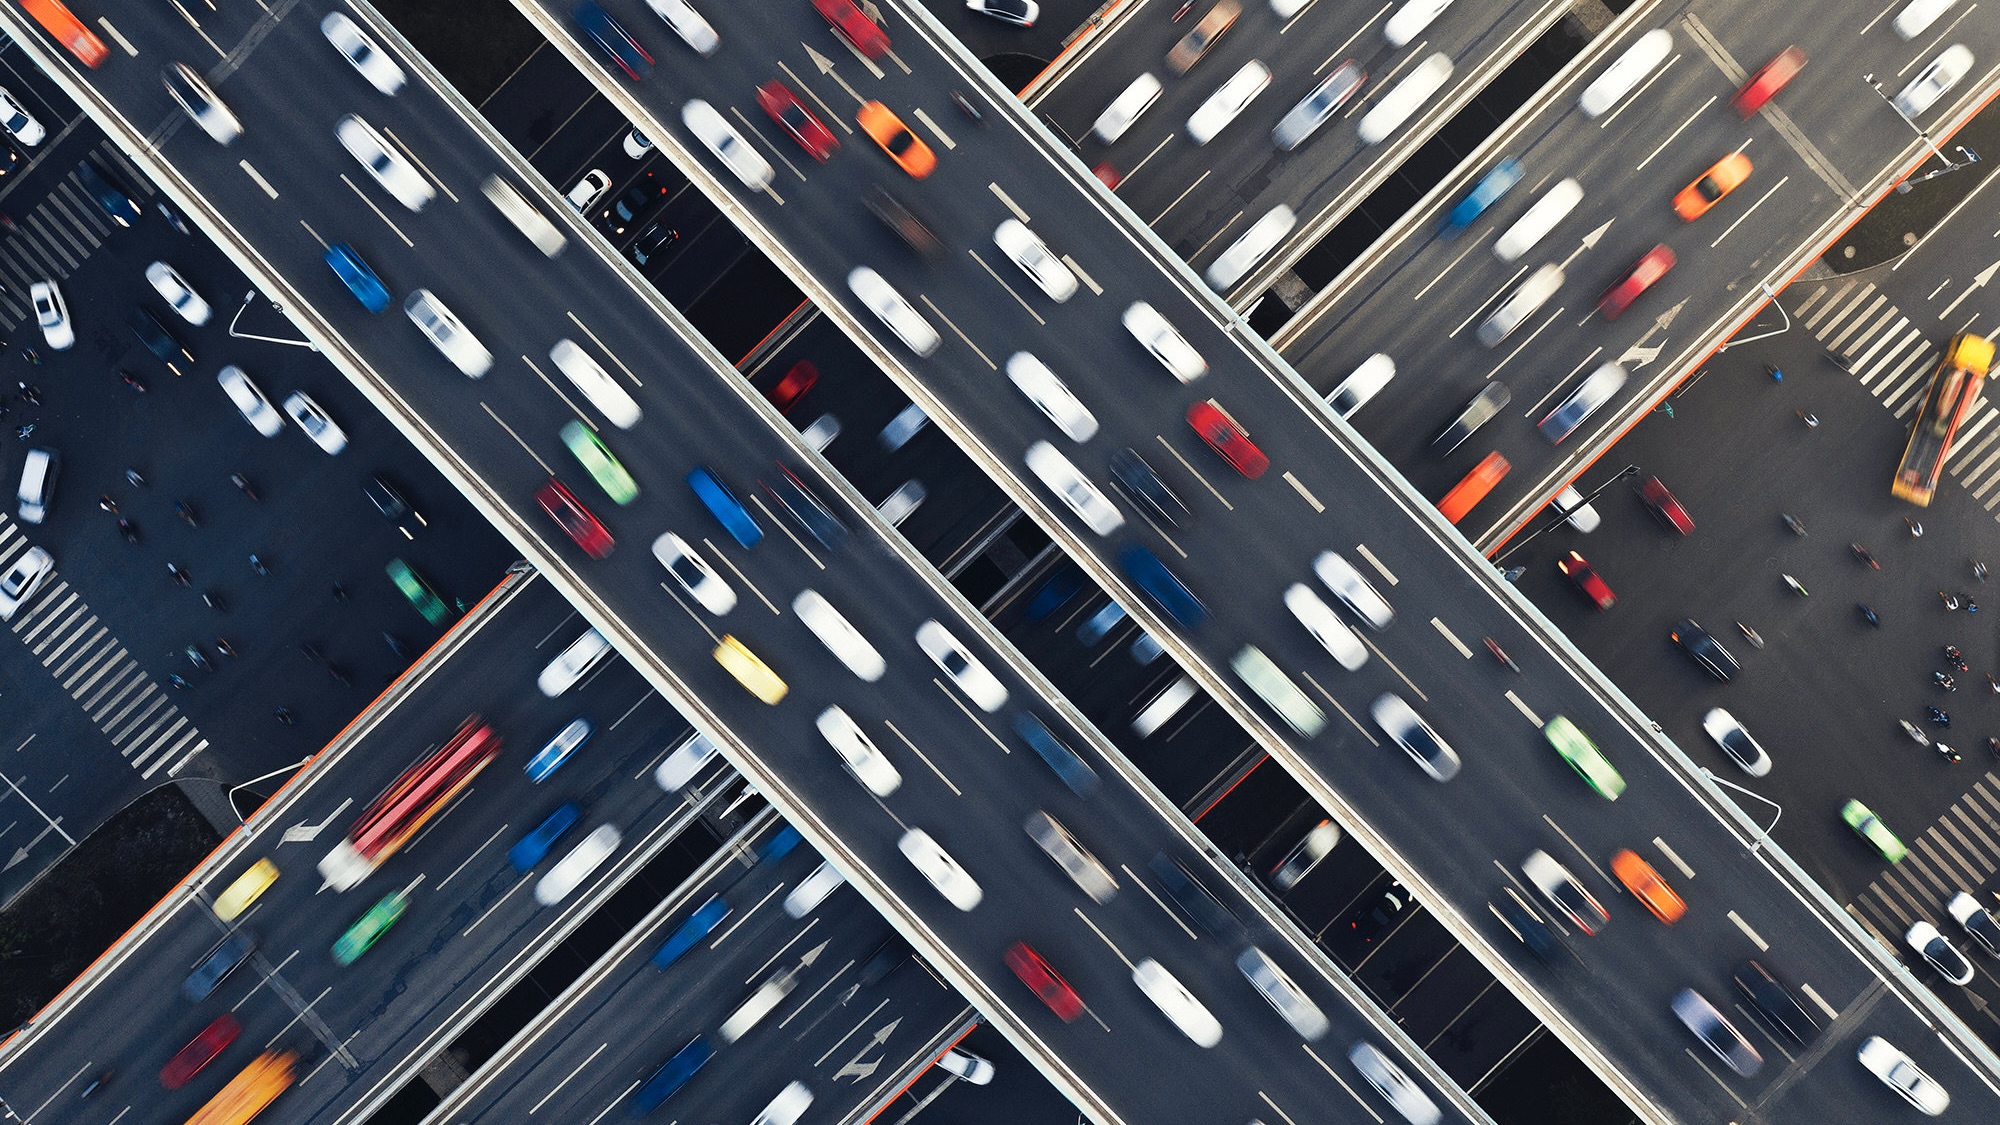
Depth of field (DoF) is one of the most powerful compositional tools in photography, allowing you to control what’s in focus and what fades into the background. While shallow depth of field is commonly used in portrait photography, creative manipulation of DoF in city photography can transform your images, drawing attention to key subjects while using the urban environment as a complementary backdrop. Understanding depth of field in an urban context Depth of field refers to how much of an image appears sharp from foreground to background. A shallow depth of field isolates the subject, while a deep depth of field keeps the entire scene in focus. Cities offer a dynamic playground for experimenting with DoF because they’re filled with layers—buildings, streets, people, and objects—all interacting visually. Shallow DoF: Works well for isolating subjects in busy environments, such as a lone figure in a crowd or a single neon sign glowing against blurred city lights. Deep DoF: Allows you to showcase the vastness of a scene, perfect for capturing intricate city details or leading lines that guide the viewer’s eye into the distance. Techniques for manipulating depth of field in city photography 1. Isolating subjects in crowded spaces Urban environments are often cluttered with distractions. Using a wide aperture (f/1.8 to f/2.8) lets you blur out the background while keeping your subject sharp. This technique is effective for street portraits, signage, or small architectural details. Position your subject close to the camera with a busy street in the background. Use a longer focal length (50mm-85mm) to compress the scene and enhance background blur. Experiment with layering—place your subject behind semi-transparent objects like windows or reflections for added depth. 2. Creating cinematic bokeh Bokeh—the aesthetic quality of out-of-focus areas—can be a striking element in urban photography, especially at night when city lights create a colorful backdrop. Shoot wide open (f/1.4 to f/2.8) with a fast prime lens to achieve smooth, dreamy bokeh. Position your subject near distant lights to create circular or hexagonal light shapes in the background. Experiment with foreground elements, like raindrops on a window or reflections in puddles, to introduce additional layers of blur. 3. Using deep focus for storytelling A deep depth of field (f/8 to f/16) is ideal for scenes where you want every detail sharp, from the foreground to the background. This works well for: Urban landscapes: Capturing towering buildings and street details in a single frame. Leading lines: Roads, bridges, and railways look more dramatic when shot with a deep DoF, pulling the viewer into the scene. Reflections: Water or glass surfaces can enhance symmetry when everything in the frame is crisp and clear. 4. Playing with selective focus Instead of keeping everything in sharp detail or fully blurring the background, use selective focus to highlight a particular part of your composition. Focus on a single subject while allowing the surrounding environment to remain slightly recognizable but softened. Try focusing on an unexpected element—like a sign, a pattern in the pavement, or a pedestrian’s hands rather than their face. Experiment with manual focus to fine-tune what you want sharp and what should fade into the scene. Practical considerations for depth of field in the city 1. Managing light and exposure Using a wide aperture means letting in more light, which can be tricky in bright daylight. Use an ND (neutral density) filter to reduce light intake while maintaining a shallow DoF. 2. Shooting at different times of day Daylight: Use deep focus to capture layered cityscapes. Golden hour: The softer light allows for creative foreground blur. Night: Use streetlights and neon signs as glowing bokeh elements. 3. Lenses that work best for urban depth of field Wide-angle (16mm-35mm): Best for deep focus shots with architectural elements. Standard (50mm): Versatile for both shallow and deep depth of field photography. Telephoto (85mm-135mm): Excellent for compressing backgrounds and achieving strong subject isolation. Depth of field is a powerful creative tool in urban photography, allowing you to control focus, guide the viewer’s eye, and bring emotion into your images. Whether you’re isolating a subject with a dreamy blur or capturing an entire cityscape in pin-sharp detail, playing with depth of field can elevate your storytelling and give your urban shots a dynamic edge. Experiment with different apertures, focal lengths, and compositions, and discover how DoF can transform the way you capture the city. Not on 500px yet? Sign up here to explore more impactful photography. The post Playing with depth of field in urban photography appeared first on 500px.
The art of long exposure in city photography
- 500px Blog
- Headline
- Home Feed
- 500px photography
- cinematic photography
- city photography
- dynamic photos
- light trails
- long exposure
- photography tips and tricks
- reflections
- streaks of pedestrians
- urban scenes
From light trails to motion blur, mastering long exposure techniques can add depth, movement, and emotion to your city shots.
The post The art of long exposure in city photography appeared first on 500px.
Long exposure photography isn’t just for landscapes—it’s a powerful tool in urban photography that transforms chaotic cityscapes into mesmerizing visual stories. From light trails to motion blur, mastering long exposure techniques can add depth, movement, and emotion to your city shots. The science behind long exposure photography Long exposure involves using slow shutter speeds to capture movement over time, turning everyday scenes into something surreal. When shooting in the city, this technique allows you to create: Light trails from moving cars Blurry pedestrian motion against still architecture Smooth reflections in rivers or fountains Starburst or light streak effects from city lights To get started, you’ll need: A tripod to keep static elements sharp A remote shutter or timer to reduce camera shake ND filters for controlling light exposure during the day Shooting light trails for dynamic urban shots Capturing vehicle light trails at night is one of the most popular long exposure techniques. Best settings for light trails Shutter speed: Start with 5-10 seconds for moderate traffic, increase for longer streaks. Aperture: f/8 to f/16 keeps details sharp. ISO: Keep it low (ISO 100-200) to avoid noise in dark areas. Find a location where traffic flow is steady, such as an intersection or highway overpass, and experiment with different shutter speeds to capture varied effects. Using motion blur for storytelling Instead of freezing people in motion, long exposures allow you to blur them intentionally, creating a ghostlike presence in busy streets or plazas. Position yourself near a static object (e.g., a street performer, bench, or fountain) and let people move around it. Use a shutter speed of 1-5 seconds to create controlled blur—just enough to suggest motion without losing form entirely. Experiment with panning techniques to blur the background while keeping a moving subject (like a cyclist) in focus. Refining your long exposure workflow Long exposure photography requires precision, but small adjustments can make a big difference. Use manual focus: Autofocus struggles in low light, so set your focus manually for sharper images. Shoot in RAW: This preserves details and gives you more flexibility in post-processing. Experiment with exposure time: Adjust between short and long exposures to find the perfect balance between movement and clarity. Final thoughts Mastering long exposure in city photography allows you to create images that feel dynamic and cinematic. Whether capturing glowing light trails, soft streaks of pedestrians, or perfectly still reflections, long exposure is a technique that can transform ordinary urban scenes into something extraordinary. Not on 500px yet? Sign up here to explore more impactful photography. The post The art of long exposure in city photography appeared first on 500px.
Capturing the pulse of the city in street photography
- 500px Blog
- Headline
- Home Feed
- be prepared
- capturing moments
- composing with intention
- composition
- creativity
- extraordinary in everyday life
- light
- stay patient
- street photography
- unpredictability
Street photography is all about storytelling. Unlike traditional portrait or landscape photography, it thrives on spontaneity, raw emotion, and fleeting moments.
The post Capturing the pulse of the city in street photography appeared first on 500px.
Street photography is all about storytelling. Unlike traditional portrait or landscape photography, it thrives on spontaneity, raw emotion, and fleeting moments. The challenge? Capturing a visually striking image while navigating the unpredictable rhythm of the city. Here’s how you can refine your approach and elevate your street photography. Understanding the flow of the city Every city has a unique energy. Whether it’s the bustling streets of New York, the quiet charm of a European alleyway, or the neon-lit vibrance of Tokyo, great street photography comes from understanding and adapting to your surroundings. Observe before you shoot Instead of immediately snapping photos, take time to observe. Look for patterns in movement—pedestrians crossing at intervals, the way light falls on a particular street corner, or how shadows shift between buildings. Position yourself where these elements align. Blend in and anticipate moments The best street photographers know how to be both present and invisible. If people notice you taking photos, they may alter their behavior. Move with the crowd, avoid sudden movements, and wear neutral clothing to blend in. More importantly, anticipate the moment—spot an interaction before it happens, and have your camera ready. Mastering light and shadows in street photography Urban environments provide natural contrasts between light and shadow, allowing for powerful compositions. Golden hour vs. nighttime shooting Morning and late afternoon light create long shadows that add depth and mystery to images. Position yourself so that subjects walk through these shadows for striking silhouettes. At night, streetlights, car headlights, and neon signs become creative light sources. Use them to frame subjects or create dramatic highlights in low-light street scenes. Shooting in harsh midday light Instead of avoiding midday light, use it to your advantage. High contrast between sunlit areas and deep shadows can create a graphic, high-impact look. Experiment with underexposing slightly to maintain detail in the highlights while letting shadows deepen naturally. Compositional techniques for stronger street shots A well-composed street photo guides the viewer’s eye and tells a story without words. The power of layering Great street photos often have foreground, midground, and background elements that add depth. Instead of just focusing on a single subject, look for additional elements that add context—shop signs, reflections in windows, or people reacting to one another. Juxtaposition for contrast Cities are full of contradictions—old vs. new, solitude vs. chaos, elegance vs. grit. Use these contrasts to create compelling compositions. A sharply dressed businessperson walking past a graffiti-covered wall, or a moment of stillness amid a crowded street, adds visual tension that keeps the viewer engaged. Framing with the environment Use doorways, archways, or gaps between buildings to naturally frame your subject. These elements not only guide the eye, but also add a sense of place, immersing the viewer in the scene. Capturing emotion and character Street photography isn’t just about capturing people—it’s about capturing emotion, personality, and atmosphere. Expressions and gestures A small smirk, an intense gaze, or a fleeting glance can make or break an image. Look for expressive moments, whether it’s a street musician deep in concentration or two strangers exchanging a silent laugh. Candid vs. engaged shots Candid street photography focuses on capturing people as they are, unaware of the camera. But don’t be afraid to interact—sometimes, asking for a portrait creates a more intimate, powerful image. The key is to remain respectful and aware of cultural norms regarding photography. Post-processing for street photography Street photos often benefit from subtle but impactful adjustments. Convert to black and white to emphasize contrast, shape, and emotion, especially when color distracts from the core message. Adjust contrast and clarity to make subjects stand out from their surroundings. Use cropping carefully—sometimes, minor adjustments can improve balance and remove distracting elements without losing the spontaneity of the shot. Street photography is about embracing unpredictability. By learning to anticipate moments, using light creatively, and composing with intention, you’ll develop an eye for the extraordinary in everyday life. Keep your camera ready, stay patient, and let the streets guide you to your next great shot. Not on 500px yet? Click here to learn about Licensing with 500px. The post Capturing the pulse of the city in street photography appeared first on 500px.
Mastering light and perspective in urban architecture
- 500px Blog
- Headline
- Home Feed
- 500px photography
- architectural photography
- architectural portraits
- artistry
- cityscapes
- documenting buildings
- experimenting with angles
- mastering light
- unique compositional elements
- urban structures
Architectural photography goes beyond capturing buildings—it’s about interpreting space, structure, and light in a way that transforms everyday cityscapes into compelling visual narratives.
The post Mastering light and perspective in urban architecture appeared first on 500px.
Architectural photography goes beyond capturing buildings—it’s about interpreting space, structure, and light in a way that transforms everyday cityscapes into compelling visual narratives. Whether you’re shooting iconic skyscrapers or hidden urban gems, mastering perspective and lighting is essential to elevating your images from snapshots to portfolio-worthy shots. The role of light in architectural photography Light defines the shape, texture, and mood of buildings, making it one of the most important elements in urban photography. Different times of day will dramatically affect your final image. Golden hour vs. blue hour Golden hour light (shortly after sunrise and before sunset) creates warm tones and soft shadows, which add depth and dimension to architectural shots. This is ideal for capturing buildings with intricate details, as the softer contrast helps define textures. Blue hour (just before sunrise and after sunset) introduces cooler tones, offering a balance between artificial city lights and natural twilight. Skyscrapers and modern glass buildings look particularly striking in this light. Midday sun: Harsh but usable While most photographers avoid the harsh light of midday, it can be useful for high-contrast black-and-white architecture photography. The strong shadows create bold geometric patterns, emphasizing lines and angles in a striking way. If shooting in color, however, you may want to use a polarizing filter to reduce glare and enhance sky contrast. Perspective and composition techniques Architectural photography is all about using angles and composition to create impact. The way you frame your shot can make a building look imposing, elegant, or even surreal. Choosing your perspective Low-angle shots make structures appear grand and dominant, emphasizing height. This is great for modern skyscrapers or historic monuments. High-angle shots can provide context, showing a building within the broader city landscape. Try shooting from rooftops, pedestrian overpasses, or even parking garages to find unique viewpoints. Corner perspectives reveal two sides of a building at once, adding dimensionality. This works particularly well with symmetrical structures. Leading lines and geometric balance Roads, bridges, staircases, and other architectural elements naturally lead the viewer’s eye through a scene. Use these to create depth and movement within your frame. Symmetry can add a clean, striking effect—especially in modern architecture where repetitive patterns dominate. However, breaking symmetry intentionally by shifting your frame slightly can create a more dynamic shot. Reflections and negative space in urban photography City environments offer an abundance of reflective surfaces—windows, puddles, metallic sculptures—allowing for creative compositions. Look for reflections in glass buildings, which can create layered images where the city interacts with itself. Puddles after the rain make excellent natural mirrors. Shooting low to the ground can turn them into powerful visual tools for doubling a scene. Negative space—like an open sky or an empty plaza—can be used to make buildings stand out more dramatically. A lone building against a clear sky isolates the subject, making it visually striking. Post-processing for architectural photography Even a well-shot architectural photo can benefit from subtle refinements in post-processing. Correcting lens distortion: Wide-angle lenses often distort vertical lines, making buildings appear to lean. Use software tools like Lightroom’s Transform function to correct perspective distortion. Enhancing texture and contrast: A slight clarity boost can help emphasize architectural details, making stone, steel, and glass stand out more distinctly. Converting to black and white: Removing color can help accentuate geometric forms and strong contrast, especially when dealing with repetitive patterns. Architectural photography is about more than just documenting buildings—it’s about revealing the artistry behind urban structures. By mastering light, experimenting with angles, and looking for unique compositional elements, you can transform everyday cityscapes into stunning architectural portraits. Not on 500px yet? Sign up here to explore more impactful photography. The post Mastering light and perspective in urban architecture appeared first on 500px.